
FirmataVB Sample Applications
You will find two sample applications on the Downloads page:
- ArduinoFirmataVB
This is a very basic application that shows how to use the FirmataVB, DigitalPinControl and AnalogPinControl to send and receive digital and analog messages to an Arduino running the Standard Firmata sketch. - ArduinoFirmataVBExtended
This is the same application as above with a few enhancements. A menu bar and toolbar have been added that allow you choose choose the serial port you want to use and to set the baud rate.
Using the Sample Applications
- Download the ArduinoFirmataVB.zip or the ArduinoFirmataVBExtended.zip file to your computer
- Unzip or extract the file to a suitable location on your hard drive
- Open the extracted folder
- Double click on the Visual Basic Express solution file - eg. for ArduinoFirmataVB the file will be ArduinoFirmataVB.sln
The project will open in Visual Studio or Visual Basic Express whichever you have installed on your computer. - Run the application by selecting Debug > Start Debugging
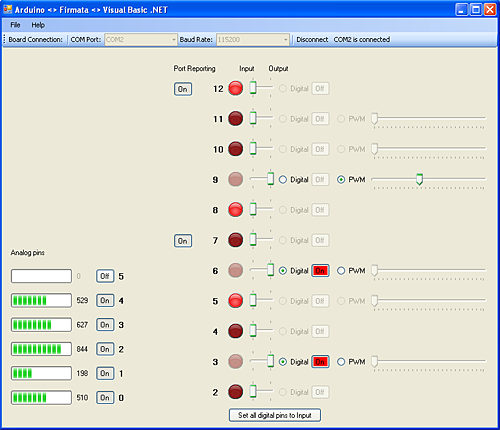
Techniques used in the sample applications
The main elements of the sample applications are:
- When the form is loaded each digital and each analog control is added to a hashtable with the control's PinNumber property as its key. This makes it easy to refer directly to a control by it's pin number.
- In the same loop that adds the controls to the hashtable, event handlers are added to each control to handle the controls events.
- The Set all digital pins to inputs button is there simply for convenience when testing the application. If it wasn't there you'd have to slide each DigitalPinControl mode select slider to the right and then back to the left to set it to an input. Once clicked you can still change a particular pin to Output by sliding the mode select slider to the right.
- The cbPort0 and cbPort1 checkboxes are used to send a Port Reporting message to the Arduino. It is not yet possible in the current version of Firmata running on the Arduino to report on an individual digital pin. It is currently done by port. On an Arduino Diecimila, for example, digital pins 0 - 7 are Port 0 (pins 0/1 are used for RX/TX so are ignored) and digital pins 8 - 13 are Port 1 (as pin 13 is used for the LED pin then it is normally set to an output)
- Event handlers have been added to handle the FirmataVB events. There are two used in the sample applications - AnalogMessageReceived and DigtialMessageReceived
- AnalogMessageReceived is easy to deal with. Firmata sends the pin (pin number) and value (0 - 1023). The pin can quickly be found from the AnalogPins hashtable and it is then passed the value. The AnalogPinControl will then display the value on the progress bar and in the text label.
- DigitalMessageReceived is a little trickier. As mentioned above, the message Firmata sends from the Arduino is a Port Report message and not an individual digital pin message. This means that we need to tell all DigitalPinControls to request a DigitalRead to check its own state.
- The event handlers added to the analog and digital pin controls to deal with sending messages are fairly straightforward and demonstrate the simplicity of sending messages to the Arduino using the Firmata protocol and the FirmataVB library.
I am not an expert programmer by any means and if you have any suggestions for improving the FirmataVB component, the DigitalPinControl and the AnalogPinControl code or the sample applications then please email me. I will share any modifications, or improvements on this site.
I would also like to hear from you if you use the code and projects from these pages and if you find them useful.
Have you made use of FirmataVB or the code?
If so, please consider showing your appreciation (all donations used to continue to pay for web hosting of this resource)
| < Analog Pin Control |

